Tuesday, July 22, 2014

~ How I Garden Organically ~ :)

 To garden naturally, without use of synthetic pesticides or herbicides, I guess is how to describe organic gardening.  For me, it has simply been how I have always gardened.  Both of my parents gardened, and did so organically their entire lives, for my mom, it was simply the love of gardening, for my dad, especially in his younger years, it was for food...mainly potatoes!  Both loved and appreciated the taste of fresh, clean food.  As a kid in the '70's, we were the only family in the neighborhood to have a compost pile, huge garden, pigs, and occasionally a sheep to cut grass in the summer and food for the winter, and this is before we moved to our farm!  Now, I start my own seeds.  It takes a bit of extra work, but the end result is plants that perform better than the nursery plants I see and have bought to fill in over the years with plants I lost in early spring.  I have found that replanting is better than buying a transplant because my tiny transplants I started from seed, even later in the planting season, have outperformed the nursery plants.  It's happened time and time again, so I no longer feel the pressure to stop at the nursery to buy tomato or pepper plants I lost to frost.

Here are some pictures of my garden this year.  So far, so good!

Volunteer Roma tomato growing in my garden.

VOLUNTEERS!  They might be my favorite plants!  The Roma tomato above sprouted up in my sugar podded peas row, and as with volunteer plants, I decided to leave it.  I find that volunteers in general, grow better than the plants I grow from seed and transplant and baby for a couple of months before they head to the garden. This plant, right now, is about 3 x 4 ft. in width, and loaded with tomatoes!

Johnny Jump Ups, or Violas, have intense color to brighten up any space.

Sometimes plants have a funny start.  I had a packet of Johnny Jump Ups I bought a couple of years ago from Seed Savers Exchange and forgot to plant (we all do that, don't we?).  After nothing came up after about two weeks, I replanted some habanero pepper seed I saved from the garden last year.  About four or five of the Johnny Jump Ups came up with the peppers, so I planted them in the garden among them.  They are growing great!  So are my hubby's habanero's. Also, I like to dot my garden with flowers.  They look pretty, plus are good for the bees, wasps, and butterflies that visit the garden. Johnny Jump Ups, or Violas, often come back year after year, a bright and happy little plant.

Young bush beans.

 Earlier in the season, I planted my favorite, sugar podded peas.  I followed with these bush bean mix from Botanical Interests.  This is a snapshot from a few weeks ago.  I've had the same problem with both the peas and beans at the farm garden this year: some critter LOVES the young leaves and the flower blossoms, and has eaten every single one!  My fault for not getting marigolds planted in there sooner, but I found a solution for both crops, which has worked for the peas and now working for the bush beans:  floating row covers!

This is how I keep groundhogs, rabbits, and deer from eating the blossoms off of my bush beans.
 No need for traps, or buying something expensive to combat the groundhogs, rabbits and deer here.  Covering the entire row (s) and simply anchoring with a rock or fallen tree branch here and there has stopped the attack!  I don't know if they are scared of the row cover, or the simple barrier is enough for them to seek snacks elsewhere, but it works, my beans are full of flowers now!  This double row is a mix of three different gourmet filet beans.  I can't wait.  :)  Also, it may not be the prettiest, but newspaper, black plastic, which I save and use year to year, pulled weeds and cardboard boxes are great mulch!!  A gardeners best friend is mulch, and all is reused materials.  I hold down the newspaper with bricks and rocks, no short supply of those around here since my dad was a bricklayer, and southwest PA is full of fieldstone!  I add pulled weeds and grass clippings over the newspaper as the season progresses, and then I can remove the rocks as needed.  I always find that I have to prop something up or hold something down, so I pile them into a very visible pile at the end of the rows when I don't need them because it stinks to trip over a random rock into crops I've worked hard to grow, and these aren't something that I want getting caught up in the tiller or mower, so keeping them visible as plants grow is very important.

My sweet peppers just starting to flower.
Peppers!  I grow several varieties sweet and hot, not only for fresh eating out of the garden, but we make our own salsa, and about 1/3 of our salsa ingredients are peppers!  I also freeze whole or halved peppers for stuffed peppers in the winter, and dehydrate the colorful peppers into strips and store them in a canning jar, they add great color to stir fries and enchiladas without out paying an outrageous price for colored peppers, and by doing this, I know the food going on my table throughout the year.

Colorful Beet Mix from Seed Savers Exchange.  
Beets!  I don't really care for the taste of beets, although I am determined to make myself like them, and I do like the golden beets roasted and I like the young beet tops in salads.  But beets are probably one of the easiest and prettiest crops to grow in the garden!  The colors of the foliage is intense!  It's so gorgeous, nothing really bothers them, other than weeds, and I have some friends that do love both fresh and pickled beets, so it's something I'm happy to grow and share!  I think sharing the bounty of the garden is important, since gardening feels more like a community event to me.  People will always talk and ask about my garden. I like that, and always hope the taste of pure, fresh food from the ground, not a grocery store shelf, will encourage others to start their own gardens.

Volunteer tomatillo's.
Last year, I planted tomatillo's for the first time, my hubby saw a salsa recipe with tomatillo's, and said he would like to try it.  I had already price tomatillo's in the grocery store, and the price was outrageous, and they seemed to sit there for a long period of time, since not too many people use tomatillo's in Pennsylvania on a regular basis, so I suggested he wait for the salsa and I would grow them in the garden.  I planned on planting the purple tomatillo's this year, but time is always short, and by the time I got around to planting them, I thought it was too late.  I was wrong.  These came up in my garden as volunteers.  I'm pretty sure I pulled the first round of them that sprouted because I had weeded this area sometime in early June.  Long of the short, we went on vacation, and when we got back and I got to weeding this area again, what do I see?  Yellow tomatillo's coming up in force!  This picture again is from a couple of weeks ago, they now are starting to flower!  Someone had told me they self seed, and they sure do!!  This is an heirloom variety, so they will be true, we will have yellow tomatillo's again this year!  Hint, hint...tomatillo salsa makes a wonderful green sauce for chile rellano's or enchilada's!

One of many volunteer squash from last year.
Have I said I love volunteers?  Well, here's another!  I had many volunteers sprout this spring.  This one in particular was in my front flowerbed.  I kept some there, and am harvesting regular Cozelle zucchini right now, but I also took some out and transplanted them into my farm garden.  This one, taken from near where the Cozelle's are growing, is a smaller, bright green globe shaped squash.  I love happy surprises.  The color of this little guy is so intense, and it should be ready to harvest in a few days.  I  can't wait~

Habanero Peppers saved from seed growing nicely in my garden.

The great thing about these habanero's is that they are from saved seed.  Well, I actually didn't save the seed...in the early spring, I noticed many intact peppers atop the black plastic in the garden.  They were paper thin, maybe thinner by March, but intact.  I could see the pepper seeds inside, and they were right where I planted the habanero's  last year, so I knew they couldn't be anything else.  On a whim, I picked some of them up and took them home to see if they would grow.  They did, and with great germination too, one pepper yielded about 48 seedlings!  Hot peppers, just like the sweet, take awhile to take off here, they need the heat to grow.  They looked pretty scrawny for awhile, and even in this picture, still a bit small, but the summer heat is their friend!  These same peppers taken a couple of weeks ago, are about twice the size now.

Colorful beets and Cozelle zucchini from the garden.
June in the garden here, harvesting amounts to root crops and summer squash mainly. Other crops are taking off to grow, and are heavy with fruit for an August harvest. Lettuces and herbs too.  I plant lettuces and leafy crops in a shaded area of the garden which is cooler, so I don't have as much bolting going on in the summer heat.
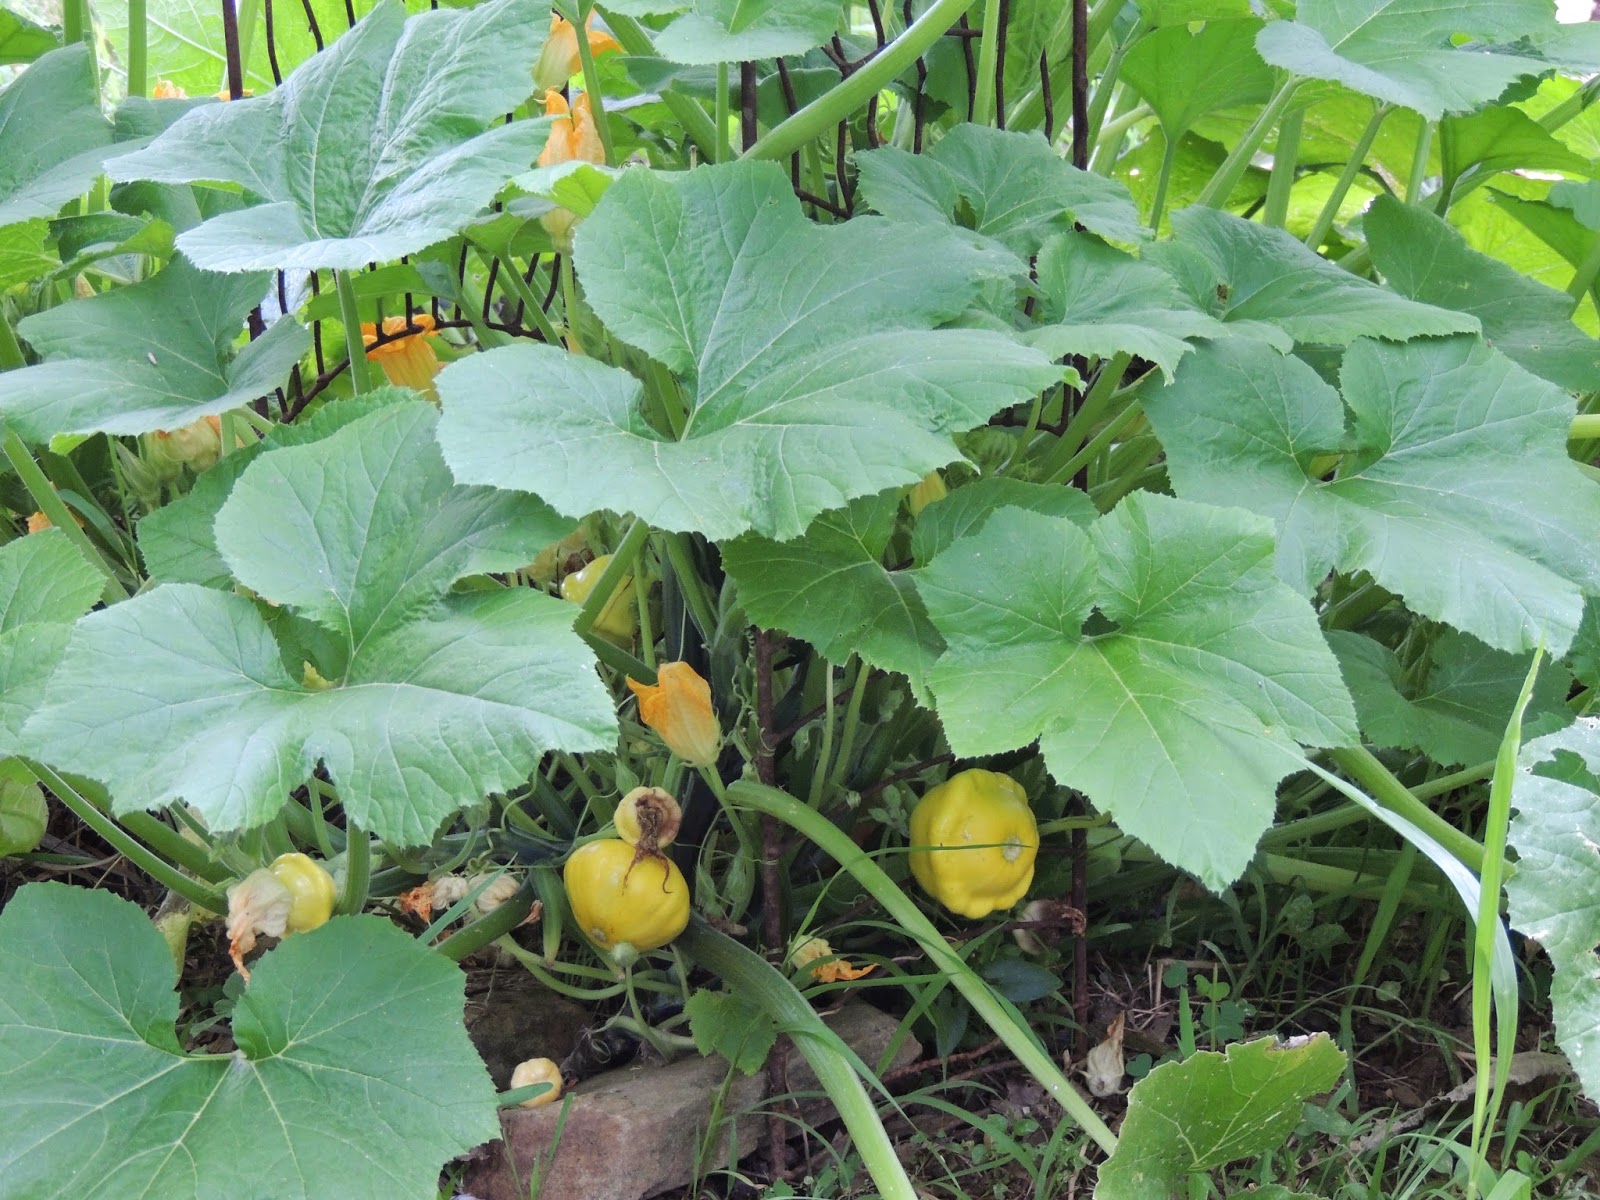
Volunteer Yellow Bush squash.
My kids have their own raised beds in the garden.  Last year, my middle daughter had a wonderful green squash, a zucchini/pumpkin cross, that was the most wonderful squash we've ever eaten.  This year, my youngest daughter has a volunteer Yellow Bush patty pan squash growing.  I picked four beautiful squashes off this plant yesterday evening.  They are so pretty, and my daughter loves the patty pans, so I'm happy that it decided to grow in her garden!  Both of my daughters also grow cantaloupe and cukes,  plus the youngest is growing cabbage for a fall crop.

Yellow apples growing on a tree in the side yard.
One huge surprise for me this year!  These apples are growing on a tree in an area of the side yard from an old orchard that was planted in an area that was really to wet for apple trees.  Over the years, they have all died out, but somehow, this has survived.  I thought last year it was dead, but I looked down in that area a few weeks ago to see this...apples!  We have several apple trees up on  the top of the hill on the treeline, some very old, some my mom planted 35 years ago, so I guess even those trees are old, but somehow, this tree pollinated!  The closest trees are on the other side of the farmhouse, and on top of the hill, the closest being about 100 ft. away!  I"m happy, I have a blueberry jam recipe that calls for tart apples to thicken the jam, so I think these will be perfect.  Last year, I made several pints of applesauce from the apples up on the hill.  It was so delicious, I can't believe I didn't make applesauce years ago!  I guess with the kids being younger, and me thinking applesauce was more complicated that it was, it was something I didn't tackle!  Fact is, applesauce is one of the easiest things to make and can for the winter!  So easy!  I have always canned tomatoes, and that does take up a bit of time, but applesauce is so easy, it's no problem fitting that into the schedule.

I mentioned blueberry jam.  So many years ago, 35 years ago, maybe more, my mom planted blueberries in the other side yard opposite the apple tree orchard.  She planted early, mid season, and late variety blueberries so as to get a longer crop.  Well, about eight of those plants are still alive and fruiting!  I have gotten a very good blueberry crop this year, have made muffins, coffee cakes, blueberry pancakes, frozen a bunch, and plan to make some blueberry jam with a bunch I picked last week and this week.  These plants are in severe need of pruning, I think I will prune half the bush so I still get fruit next year, and then follow with the next half next year. A few of the bushes look terrible, but they have leaf growth, so those I'll probably give a harder pruning.  Of the eight plants, five are still fruiting nicely!  Not bad for very old bushes!!

My tomatoes are going strong, as well as my Big Max pumpkins have pumpkins forming, my pole beans are starting to take off, I'm planting a fall crop of lettuces, peas, beans, cabbage, Brussels Sprouts, kohlrabi, and flowering cabbage, just to keep things pretty!  Mulch is my best friend.  Keeping ahead of weeds makes for healthier plants, which makes the plants be able to resist attacks of fungus or bugs.  I still fight with slugs and cabbage worms, and as I've said, floating row covers are working great for me. They may not look so great as people glance from the road into my garden, but the end result is getting a nice healthy crop.  I don't mind sharing some of my crop with the critters, that's just nature, but they tend to be rude dinner guests and eat everything in sight!  Next order of business...teach the critters some manners!!  :)

Do you have any gardening questions?  I have gardened my entire life, and have found solutions to keep from having to use chemical fixes.  Nature takes care of nature.  If you are patient and committed, there is always an answer in nature, and often closer than you think!


Wednesday, July 16, 2014

The Lettuce Project: ~ Another Way to Use Tuna....Tuna Cakes ~

The Lettuce Project: ~ Another Way to Use Tuna....Tuna Cakes ~: My brother gave me a huge restaurant sized package of tuna that he bought in bulk  I was happy to take it, my family really likes tuna, but...

~ Our Incredible and Super Cool Air Tent ~

 When I was a kid, I grew up in a large old farmhouse that didn't have air conditioning.  It was all fan power to keep cool in the summertime!  We were inventive kids and would make 'air tents' by draping a light bedsheet over top of the box fans and weighting them down with anything we could find to be sure our 'roof' didn't fly off!  It was actually a happy and fun childhood memory which I passed down to my kids a few years ago.  We have central air in our house, but honestly, I try to use it as little as possible.  They have perfected the art of building an air tent.


Whereas I used rocks, cups, knick knacks or whatever I could find around the house as a kid to weigh down my tent, my daughter came up with the ingenious idea of tying the center of a twin sized top sheet around the handle on our box fan.  Why did I never think of that for all of those years?!?  Anyway, good thinking!  She made an afternoon out of this, so she brought in the raspberry air freshener she bought for her room.  She built this in the corner of the room next to the couch, a corner curio, and a side chair.  Perfect placement, perfect construction!


She even supplied snacks while we hung out in there!  Lemonade, raisins, peanuts, and homemade granola bars and chocolate chip cookies. She also had a pitcher of water behind the chair along with the drinking cups.


 I gladly crawled in to hang out, but Dad didn't want to, so he asked my other daughter for a cookie.  She reached her hand in for the handoff.


The handoff of two chocolate chip cookies!


Our pets had to check it out too. Max, our lab/collie/shepherd mix was the only one to come all the way in and stay for awhile.  He's about 50 lbs. but thinks he's a lap dog~


Our kitty cat Emma came in but swiftly went back out.  I guess the fans made too much noise.  We were afraid that afterward she would jump onto the top of the air tent and come crashing down, claws open and all, but she didn't.  Thank goodness!


Our German Shepherd Megan, came to investigate, but decided to hang out outside instead.  She's probably too big to get in there with us anyway!   She's a good girl.


This is the ingeniousness of tying the center long end of the bed sheet to the fan handle.  There is no flying off of bed sheets, or being clunked with some heavy object that would have otherwise weighed down the tent!  And this picture is taken in 3-D...a function I didn't know existed on my camera until a couple of days ago!

Anyway, go and make an air tent and gather some snacks or a magazine or book and spend a bit of time just relaxing.  You'll be glad you did...time slows down a bit in an air tent!


~ Another Way to Use Tuna....Tuna Cakes ~


My brother gave me a huge restaurant sized package of tuna that he bought in bulk  I was happy to take it, my family really likes tuna, but I've never had so much at once in one package that once it was opened, I needed to use it.  I've never frozen tuna before, so after we had the usual tuna salad (which my daughter made herself and it was quite delicious), I needed to find another way to use it because I didn't want it to go to waste.  Here's what I came up with.  Tuna Cakes.


I started my search on allrecipes.com and found a recipe for tuna cakes.  I liked the idea, so I read the recipe and the reviews.  Some reviewers noted that while the recipe as is tasted good, it lacked texture, so I decided to add some veggies to the mix, and changed a few other things around also.

~ Spicy Tuna Cakes ~

3 packages of tuna (drained if you are using canned tuna)
2 medium sweet potatoes, cubed, cooked until tender, and drained
2 eggs
1/2 teaspoon hot pepper flakes
1 teaspoon Italian seasoning
1 teaspoon dried basil
1 Tablespoon minced onion or 1 finely chopped medium sized onion
3/4 cup breadcrumbs
1 carrot, peeled and finely chopped
1 celery stalk, finely chopped
A dash of pepper
A dash of paprika

First, prepare the dipping sauce in the recipe below and set in the refrigerator while preparing the tuna cakes.

Place cubed sweet potatoes into a large bowl and mash with a fork
Next, combine all ingredients to the sweet potatoes in the large bowl and mix until everything is incorporated.  Heat a large cast iron skillet and add about two teaspoons of oil (I use olive) and heat on medium high heat. Once the pan is hot, decrease the heat a bit.  Add tuna cakes and cook about 1-2 minutes each side.  These cook up quickly, so stay nearby so they don't burn. Transfer to a serving plate and set aside as the rest of the meal is prepared.  They heat up very nicely in the microwave if needed.

~ Dipping Sauce for Spicy Tuna Cakes ~

1/4 cup mayonnaise
1/8 cup Dijon mustard
1 teaspoon minced garlic
1/8 teaspoon chili powder

Mix mayonnaise, mustard, garlic, and chili powder in small bowl and set place in the refrigerator until ready to serve.


I made a side of zucchini from our first two zucchini's harvested from the garden!  Delicious!  Super fresh zucchini has a light sweet taste of corn.  I love it!  We just pan fried this in just a bit of honey butter, only about 1 or 2 teaspoons for two medium squashes.  This filled a large skillet.


I finished off the meal with a side of  Spanish rice I had in the pantry.  I often make our own rice, and stay away from the packaged stuff, but sometimes when time is short, I'll pull one of these out if I have any on hand.  I really need to not do that though, since the salt content is high in these packaged rices.  This morning, I'm feeling that salt in the form of puffy ankles!  Extra water today, and I have to come up with a plan for making a spice mix to use with our bulk uncooked rice!

The dipping sauce was a very nice touch to the tuna cakes, I would recommend making it.  There isn't much heat in this recipe either, even though there are hot pepper flakes and chili powder.  The tuna tones it down very nicely, just leaving a hint of heat.  You can add more hot pepper if you like.  I like things milder, my hubby likes things hot.  The compromise in this house is to make most recipes milder, and he can add extra heat as he likes it.  My kids ate this too without complaint, dipping sauce and all!  Enjoy.

Until next time...have a nice day!!  :)

Wednesday, March 26, 2014

~ Chocolate Cake with Surprise Buttercream Icing Pockets ~


 Yum!!  This cake is just pure fun and pleasure, and very simple!  Again, I simply baked a boxed chocolate cake mix according to package directions except I always substitute applesauce for the oil in equal proportions.  It turns out much moister this way.  (And in a very small way, negates just a bit the buttercream icing!)


I baked this cake for my family in a large baking dish, about 12x15 inches, and let it cool.  I then placed some buttercream icing in a pastry decorating bag with the star tip and simple inserted the tip into the cake to almost the depth of the cake.  It's really just to the end of where the decorating tip meets the bag, this is single layer cake, so that worked well.  I tried to make evenly spaced rows of icing, but like my Mom used to say when I was planting rows of veggies in the garden...I can't make a straight row!!  This too, will be iced so I think the surprise of pockets of icing in the cake will make up for my crooked rows!


My kids are chocoholics, so I added a light drizzle of Hershey's Syrup directly over the cake.


I used the star tip to ice the cake also, in long zig zag rows to cover the cake, and drizzled more Hershey's Syrup at my daughter's request on top to give it a finished look.  This cake is awesome...first, very moist with a couple nice levels of chocolate taste to satisfy my chocoholic family, and is very pretty, an very simple to make.  Again, an easy and quick dessert that looks like it was harder than it was.  This was so easy, and so simple, there's not much reason to buy a store bought cake!!

Enjoy!!  'Til next time...have a great day!  :)


~ How to make a White Cake with Strawberry-Rhubarb and Strawberry Garnish Easy and Simple ~


 Alright, cake decorating is a hobby of mine, I truly enjoy it, and it doesn't have to be complicated!  My brother-in-law just celebrated a birthday, and he loves strawberry-rhubarb pie, which I forgot and didn't have fresh rhubarb on hand to make the pie, so I came up with this White Cake with Strawberry-Rhubarb Sauce instead.  It was easy to make, from a boxed mix...yes, boxed mix, and so pretty. 

Here's step by step instructions on how to I put it together.

First, I baked the cake according to the package instructions, but I always substitute applesauce for the oil the recipe calls for in equal proportions.  On a white or yellow cake, I will sometimes add canned or frozen pumpkin instead, and is actually one of my daughter's favorite cakes ~ pumpkin cake with cinnamon cream cheese frosting, but with this one, I used the applesauce.


 After the cake was cooled, I sliced it half horizontally, and poked some small holes with the end of a small dowel rod, you can use the end of a thin wooden spoon too, you just want to make some holes so the sauce can creep down into the cake.  Spread strawberry-rhubarb sauce over the entire bottom half of the cake, and it will look like this.  I used a bought version from Tastefully Simple, but I planted rhubarb last year, so I should be able to make and preserve my own sauce this year.  (That is a story all in of itself!)


 I placed the top half of the cake back in the pan while I iced the bottom layer.


I added vanilla buttercream icing over top of the strawberry-rhubarb sauce and iced to just a bit over the edges.  This makes it much easier to ice the outside of the cake later.


I then placed the top of the cake over the bottom iced layer.  Now, this is where I keep it real, because these things happen...the top layer broke apart as I transferred it from the pan...no biggie...I'm icing the top layer, so I just pieced it back together.  This cake is very moist...a perk of the applesauce.  The icing covers this up, and I'm going to guess my brother-in-law didn't even realize it had cracked apart!  Again, no biggie, this is life, and there is no reason to waste an entire layer of cake when something like this happens!!


Once the top is iced, it will look something like this.  This is a great icing technique for a beginner because it is simply a swirl pattern.  You can use the back of a spoon to make the swirls and peaks, or simply the edge of the spatula used to apply the icing to the cake.  See, you can't even tell the top layer split apart, icing fixes everything!!


This step was both fun and easy.  I simply took about one tablespoon of the strawberry-rhubarb sauce and about one tablespoon of Hershey's Chocolate Syrup and warmed it until it had a nice consistency that would pour from a spoon.  This is a very sweet and rich tasting sauce, so you don't need much, since the cake is already sweet.


Apply the glaze over the cake, make sure the glaze is only warm, not hot, so the buttercream icing doesn't melt!  It will look something like this, don't worry about it being symmetrical on the cake, just so the glaze looks overall even, it doesn't have to be perfect.


This is where I garnished with strawberries.  I wanted the garnish to be symmetrical here, so I cut one large strawberry into wedges, I was able to make eight wedges out of this one, it was a huge strawberry!  Anyway, place them atop the cake in a symmetrical pattern...the garnish will end up balancing out the cake since the glaze was just drizzled on.


Take a look at your cake after the first strawberry garnishes are in place, and then decide how you want to fill out the cake.  It doesn't have to be like I have chosen, just follow your eye and add the garnishes to what pleases your eye!  I decided to add just four more wedges in between the first four, and the cake ended up looking like this.


It's beautiful!!  It's the strawberry-rhubarb that he loves, and even though it's not the pie he loves, this will satisfy his sweet tooth until I get rhubarb from my garden!  Also, a footed cake plate can make all the difference in presentation for a cake or dessert, and can be found at springtime estate and garage sales and thrift stores for a fraction of what they cost in a discount or department store.

See, this is a GORGEOUS  cake, and it was so easy to make and put together, really, once the cake baked and cooled, and the buttercream icing was made, it took about twenty minutes to decorate this baby.  That's it...quick and simple, and anyone can present this cake to their friends and family and save a ton of money in the process.

This was such a pretty cake, I made a chocolate cake for my family just to be certain there wouldn't be and icing missing and not so mysterious finger prints in my brother-in-laws cake!!

'Till next time....Have a great day!!  :)

Monday, March 10, 2014

~ What Exactly is it to Garden Organically? ~


Well, I have to honest and upfront first and foremost...I have been an organic gardener for as long as I can remember.  My Mom especially was an avid gardener of anything she could get seeds or plants to grow, and my Dad was more of a substance gardener...gardening to eat, potatoes and corn specifically, my Mom would and did grow anything, vegetable or flower.

One of my favorite sights...corn tasseling.

 Organic gardening...gardening without the use of synthetic herbicides or pesticides.  It's not as difficult as some make it.  Now, I have no formal degrees or certifications, I simply have lifelong knowledge of what I was taught by many 'mentors', and by what works for me.  It doesn't take a lot of money, and sometimes, well often, I think that organic gardening was born out of necessity.  Necessity years and years ago by people of native lands using what was immediately available to them, and now in modern times by people who either have to or want to use what is immediately available to them.  This can range from anything organic that can enrich soil, protect plant life by adding nutrition as it breaks down and moisture and insulation to their roots.  I use what's available to me...newspaper, cardboard, hay, straw, discarded weeds, kitchen scraps...yes, kitchen scraps can be added directly to the garden and it will compost throughout the growing season, and act as mulch at the same time. 

Brussels's Sprouts...love them or hate them.  I love them!!

I don't think a weed free garden is a good thing anyway.  Certain pest bugs feed on weeds like burdock and other weeds, plus these weeds are usually native to their specific area, and wildlife depends on these weeds for food or shelter, so not all weeds are bad, just usually in a bad place when we plant our gardens.  I've never had a weed free garden...not for lack of desire, but because they are just so resilient!   I have learned over the years to be more tolerant of certain weeds, and that some weeds are edible.  Dandelions anyone?  I just read a teaser on our internet home page about how dandelion beverages are making a comeback!  that strikes me as funny, because I have always know people who love to make Dandelion wine!  The entire plant is edible.  I'm pretty sure that dandelions will populate the earth long after humans are gone, and that's just one nuisance weed!  So weeds are a bad thing next to your tomatoes and lettuce, but at the perimeter of the garden, or away from it a bit, they serve a valuable purpose.

Cockscomb Celosia...one of my favorite flowers and one of the easiest to grow!

I plant both vegetables and flowers interchangeably.  They often benefit each other, plus they look pretty, not to mention the pollinator's they attract right to your garden, and your plants that depend on those insects!  Several flower varieties either attract pests, such as nasturtiums attracting aphids, and marigolds and mints deterring many pests by masking the scent of desirable plants, or simply by being unappealing to them.  I personally love the scent of marigolds!

This apple tree was planted by my mom when  I was a kid, and now my kids harvest the apples!

Organic gardening can come in many shapes and sizes too.  Fruit and nut trees are often grown along tree lines, and abundant wild berry bushes, at least around here, and can be harvested by humans and animals alike.  Another thing about gardening organically, or living on an organic farm, be prepared to share with nature.  It's bound to happen anyway, so making it a more pleasant experience for all involved is best.  Now they can't devour your entire crop, but native animals are just as crucial to an ecosystem as plants.  Animals eat and scatter seeds and the loot they leave lying uneaten, either gets eaten by another animal or insect, or acts as a fertilizer where it was left, or new plants sprout.  I personally enjoy watching wildlife, so the thought of trying to completely keep them away is counterproductive to me.  If a food source, such as an apple tree and wild berry bushes are planted far enough away from the garden, most critters would prefer to feed away from humans anyway!


Flowers grow harmoniously in my garden along with vegetables.  Here sunflowers are dual task, they are beautiful to look at, plus great at attracting bees and butterflies to pollinate other plants, and birds to eat and spread the sunflower seeds.  The birds eat slugs and garden pests too!

So in a nutshell, it's not hard to garden organically, it just requires the desire to do so.  Once the desire is there, it's possible.  Once the understanding is there that gardening this way is time consuming, it shifts from being a task to being a thing of leisure.  It's best to start gardening small.  Plant what you will be certain to eat first.  Once you have success at what you will eat, think about something you like to eat and consider growing that.  For instance, most people don't have any idea of how much goes into planting and harvesting broccoli or cauliflower, it can take a few trys to get it right, so don't get discouraged.  Don't overwhelm yourself, if you do, you'll never get the part of gardening that is leisure instead of a task. And doing things for leisure is a lot more fun that task oriented work!   It's still work, but all good things require work.  The reward is wonderful, healthy food to enjoy by family and friends.


I'll post more on specific areas of organic gardening, but is there something specific you would like to know? If I have an answer or solution, I'd be happy to share my experiences!  None of us know everything, so gardening and farming is a community task sometimes, we rely on the knowledge of many for our successes!

'Til next time, have a great day!  :)